Migrating from Stream Classic
Like what you see??
"Ask Sympraxis" is a bi-weekly webinar series, where we discuss an array of topics and answer your submitted questions. Join us by downloading our recurring calendar event. You can also join us directly in the meeting without downloading the event.
Do you have a challenge similar to this episode and want to learn more? Are you interested in learning more about Sympraxis Consulting and the work we do? Fill in our or Work With Us form and we will get back to you.
See a listing of Ask Sympraxis episodes by topic covered: Topic List, Series List, or a full listing Archive
Do you still have videos saved in Microsoft Stream Classic? It’s time to migrate your videos to SharePoint! Originally Stream Classic, and before that Office 365 Videos, was a separate destination than content saved in SharePoint. However, as videos are essentially just another object that people need to interact with, similar to a document, bringing videos into SharePoint allows you to manage all your content in one location regardless of the file type. Now that videos will be stored in SharePoint document libraries, you’ll have more options on how you’re able to work with them. In this session we talk about stream migration and how to navigate your Stream classic migration to SharePoint.
Each channel in Stream Classic will migrate over to SharePoint into a single document library thanks to the help of the Microsoft built migration tool. However, just like any other migration, we highly suggest you think about each video and whether you need to take it to SharePoint. Like many people, you may have used Stream Classic as essentially a dumping place for all your videos. This is the perfect time to review your videos and save only the critical content. You can use this opportunity to adjust your information architecture and distribute your videos into different document libraries where the correct content owners will have access to manage them.
How does a Stream Classic migration work?
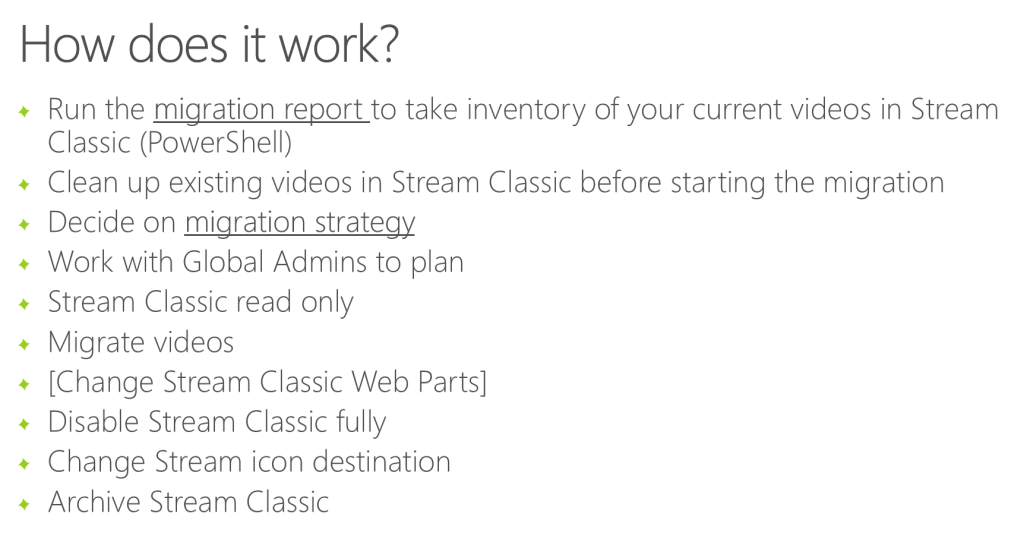
The first thing we suggest you do is run the migration report using PowerShell. This will inventory all your current videos in Stream Classic and output that data into a .csv file. You can also connect a Power BI template to this as a data source. This gives you a nice dashboard that provides a ton of useful information including how many containers you have, how many videos there are, and where potential issues may arise.
You may notice in your inventory that some videos are not eligible for migration. Unfortunately, we aren’t sure why. There might be a backend automation problem. Hopefully, your ineligible videos are a small number or nonexistent.
Based on this migration report, you can more easily do your cleanup. For example, do you need all those videos that are 5+ years old? It’s not that you can’t move everything, but if you don’t need it, then why bother?
The second step we suggest is to determine a migration strategy. The article Migration strategies for moving from Stream (Classic) to Stream (on SharePoint) - Microsoft Stream | Microsoft Learn outlines several strategies suggested by the Stream team. If you have a large organization or you work heavily with video, this migration can get fairly complicated, and these strategies will help you think through how to proceed.
The third step is to keep in mind that you’ll need to work with your global admins on this migration. Currently, the icon behind the waffle in Office 365 points to Stream Classic. You will need to adjust that to point to the office.com video page when you’re done.
How do we start a Stream Classic migration?
In short, once you get started, you will set Stream Classic to “read only”. You will then proceed with the migration. You need to change the Stream Classic web parts, disable Stream Classic, change the Stream icon destination, and then archive it. It sounds a little more complicated than it really is! The Stream migration tool and the documentation from Microsoft on how to do this are both helpful.
You will proceed with the migration by using the Stream migation tool that Microsoft has provided in the SharePoint admin center. This means you need to be an admin in SharePoint to actually take these steps. This tool will then take you into a Stream container inventory in the migration center. The first time you visit this location you will see there is a button that essentially accesses your Stream Classic environment and discovers all the different containers that currently exist. This scan can take seconds or hours, it depends on how many videos you have.
Once your containers have been accessed you can select any number of those containers and add them to a migration. This will move them over into a single document library in SharePoint. This merging of containers works well. However, there currently is no way to split a container into different document libraries. Between the names of the videos and the type of containers, you should be able to figure out where they should be migrated. You can perform this scan as many times as you want. Another excellent feature of this tool is that it will provide you with stats as you go through all the migrations.
Potential caveats
Separating Content
As mentioned, the migration tool works well for combining but not great for separating content. A work around for this is that you can migrate containers into multiple locations in SharePoint. For example, if the HR container had 30 videos, you can migrate all those over to the new HR document library and the new benefits library then just delete those that are not needed from each. Another option is to migrate all the containers into a singular document library in SharePoint and then use the “Move to” capability to separate them into the correct locations. This is one of the benefits of the videos being saved as documents in SharePoint: it makes adjustments easier.
Redirect
When you perform a migration, anything that was part of the migration goes into a folder in the specified destination document library called “Stream Migrated Videos” with a folder named for the original container. For example, if you migrate a channel called “Company Meetings” into a library, the videos from the channel will end up in a “Stream Migrated Videos/Company Meetings” folder. In an ideal world, you would then easily move those videos into the new locations where you want them saved and any redirects would change based on those moves. This is where the redirect stops working, however. Any links from the old Stream Classic URL will redirect to where the video was stored within the Stream Migrated Videos folder. In our opinion, this folder doesn’t make a lot of sense. What is the point of separating the videos migrated from the new ones you are uploading going forward? We have a PowerShell script built in the resources below that will help you easily figure out where all those original videos are embedded in Stream (Classic) Web Parts so you can adjust the links.
Information Architecture
For the most part, migration preserves the metadata with the videos. Therefore, things like transcripts, subtitles, chapters, etc. will not show separately from the video in the library but are saved “inside” the video. However, based on how complicated your metadata is you may come across issues during the migration.
Central location for videos
One final thing to keep in mind is that the office.com video page is not the same thing as the Stream Classic home page in that it is not a video center. However, you can build centralized views of videos just like you can with any other content, using a document library web part, a highlighted content web part, PnP Modern Search web part, or custom code. That said, statistics show that most people view videos in the destinations where they are embedded - in context - instead of through the Stream Classic home page. We do not suggest running off to make a new video center just because you used to have one.
With these few caveats in mind, the documentation provided by Microsoft on this migration is incredibly good. However, we do suggest going through and reading the documentation in the order that is listed in our resources section. This is different from the way Microsoft’s table of content has them laid out. These were added as resources in the order that made sense to us based on physically performing a migration. As Stream Classic is retired, this migration is a necessary step to saving your videos. It also provides a great opportunity to adjust your information architecture and better set yourself/your organization up for success with videos in the future!
All Resources
- Overview of Stream (on SharePoint) - Microsoft Stream | Microsoft Learn
- Migration strategies for moving from Stream (Classic) to Stream (on SharePoint) - Microsoft Stream | Microsoft Learn
- Migration details - Microsoft Stream | Microsoft Learn
- Stream (Classic) to Stream ( on SharePoint) migration tool - Microsoft Stream | Microsoft Learn
- Step by Step guide to run the migration tool - Microsoft Stream | Microsoft Learn
- Overview of migrating from Microsoft Stream (Classic) to Stream (on SharePoint) - Microsoft Stream | Microsoft Learn
- Find All the Stream (Classic) Web Parts During Migration to Stream in SharePoint | Marc D Anderson’s Blog (sympmarc.com)
Do you have any questions for us? Continue the conversation on Twitter with the hashtag #AskSympraxis and mention @SympraxisC.