Create a Policy Center
Like what you see??
"Ask Sympraxis" is a bi-weekly webinar series, where we discuss an array of topics and answer your submitted questions. Join us by downloading our recurring calendar event. You can also join us directly in the meeting without downloading the event.
Do you have a challenge similar to this episode and want to learn more? Are you interested in learning more about Sympraxis Consulting and the work we do? Fill in our or Work With Us form and we will get back to you.
See a listing of Ask Sympraxis episodes by topic covered: Topic List, Series List, or a full listing Archive
What is a policy center?
For the sake of this session, we are discussing building a policy center. However, what’s covered can really be applied to an infinite number of other types of content. The approaches discussed would work for any distributed content management scenario, which is the ultimate goal we are seeking to achieve. Ideally, we want every department or work group to manage the policies that they own rather than having one site or document library that everyone has to submit their content into. Instead, we can create the information architecture so each department can upload their policies to their department site and then the SharePoint site will show a unified view of all those policies regardless of where they sit. This creates a search driven experience that is customized based on the content that we are working with.
Why create a policy center?
A policy center allows individual departments or work groups to manage the policies they own with less friction on the content management process. This lets you manage permissions at the top level of a site and not increase complexity by trying to manage unique permissions. Policy creators can upload their policies to a library in their departments. The search index will then crawl that content. Once it is crawled it will be automatically included in the policy center. This process makes it significantly easier for searchers to find the content. They don’t need to know who owns the content. For example, they don’t need to try to figure out if the policy is an HR policy or a finance policy. Instead of searching those individual group sites, the content is pulled into a centralized location therefore easing access and search significantly.
Steps for implementing the policies libraries
It really boils down to setting up your information architecture in the beginning correctly. Create a policy content type in the content type gallery. That can then be propagated out to an infinite number of sites. You’ll want to create your site columns as they’ll provide you with good metadata. Then you can create a policy library in each site where you need it. However, keep in mind that you need to have at least one library with at least one piece of content that has all the metadata filled out. You won’t get all the crawled properties if there isn’t at least 1 piece of content with all the metadata value sets. Another thing to be wary of is that when you create the policy library and enable the policy content type, what you’ve done is added a policy as the second content type that’s available in the library. The first type is a document. You’ll want to go into the old library settings and delete that document content type from the list. If you upload content into the library and it becomes a document instead of a policy, then none of this works.
Steps for implementing the policy center pages
First, map site columns you’d like to use for filters in the policy center. Once you have all the data and it gets crawled, you need to make sure you create managed properties to the site columns if you want filters to be accessible. You have the data in the site name property so map it to a managed property in the refinable strings and then you can pull it forward as both a filter and something you can display on the screen. You also want to create a result source to help with creating a smaller index of data, so you are not searching against the entire search index. This helps to improve performance of your search queries. You will then need to create a new page using the PnP Modern Search web parts.
The policy center page
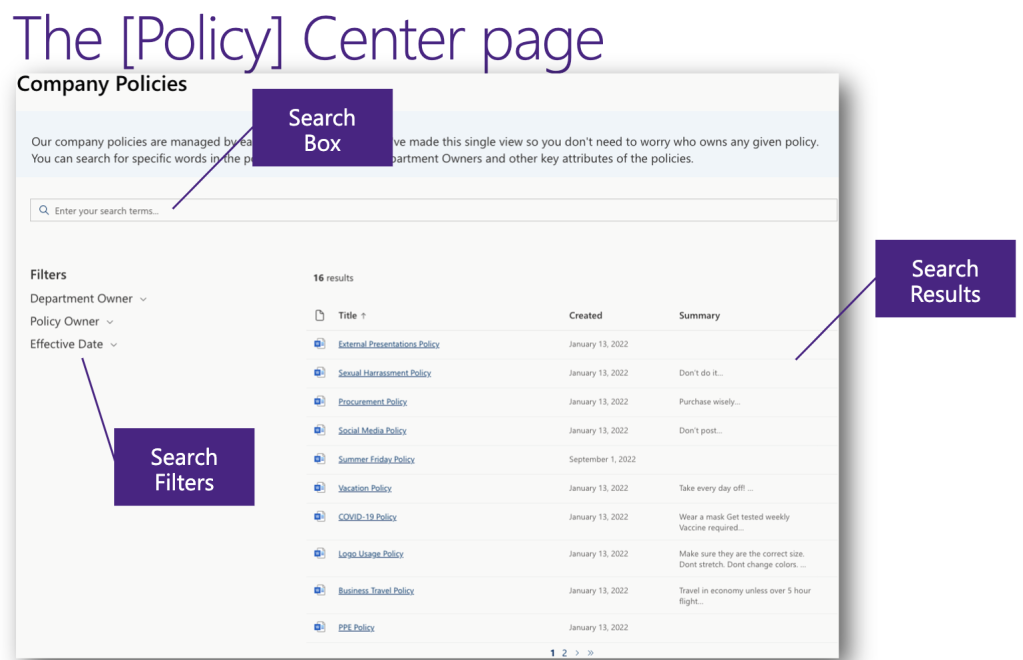
There are lots of parts to the PnP Modern Search web part however the three we use in this example are: search box, search results, and search filters.
Search box: Collects the input.
Search results: This is set to configure directly against the result source. There are a ton of different layouts you can configure so you can create easy ways to slice and dice the content visually for your users. A huge benefit to this page is that you can set it up without writing any code. For those more comfortable with writing code, you can use custom CSS, custom handlebars templates, or custom adaptive cards where you can create unique visuals for your search results. There really is an option for everyone and every skill set to be able to set this up.
Search filters: These filter the web part. This will only accept the managed properties that have been crawled. Again, you will only see filters if there is content within that value. For example, if finance hasn’t uploaded a policy yet, you don’t see finance as a filter.
Automation opportunities
We suggest creating a site template. It’s fairly simple to create a site template and they can then be used as building blocks. For example, you might have a site template called “add policies template” which you can then run on any site. Another suggestion to help make this process better would be to use PnP PowerShell to export the policies library schema into a site script. You can then edit the exported site script to clean it up.
Overall, the ability to create a policy center creates ease not only for the searcher but also for the content managers and site owners. As mentioned in this session, there are full Ask Sympraxis sessions that can be derived from this topic. If you have any ideas, questions, or topic suggestions please continue to submit those to our mailbox at symp.info/AskSympraxis. See you next session!
All Resources
- Introduction - PnP Modern Search
- How Do Site Columns Become Managed Properties - Thus available for Search? | Microsoft Learn
- Emily Mancini’s session at CollabDaysNE - Centralizing Content in a Decentralized World
Do you have any questions for us? Continue the conversation on Twitter with the hashtag #AskSympraxis and mention @SympraxisC.